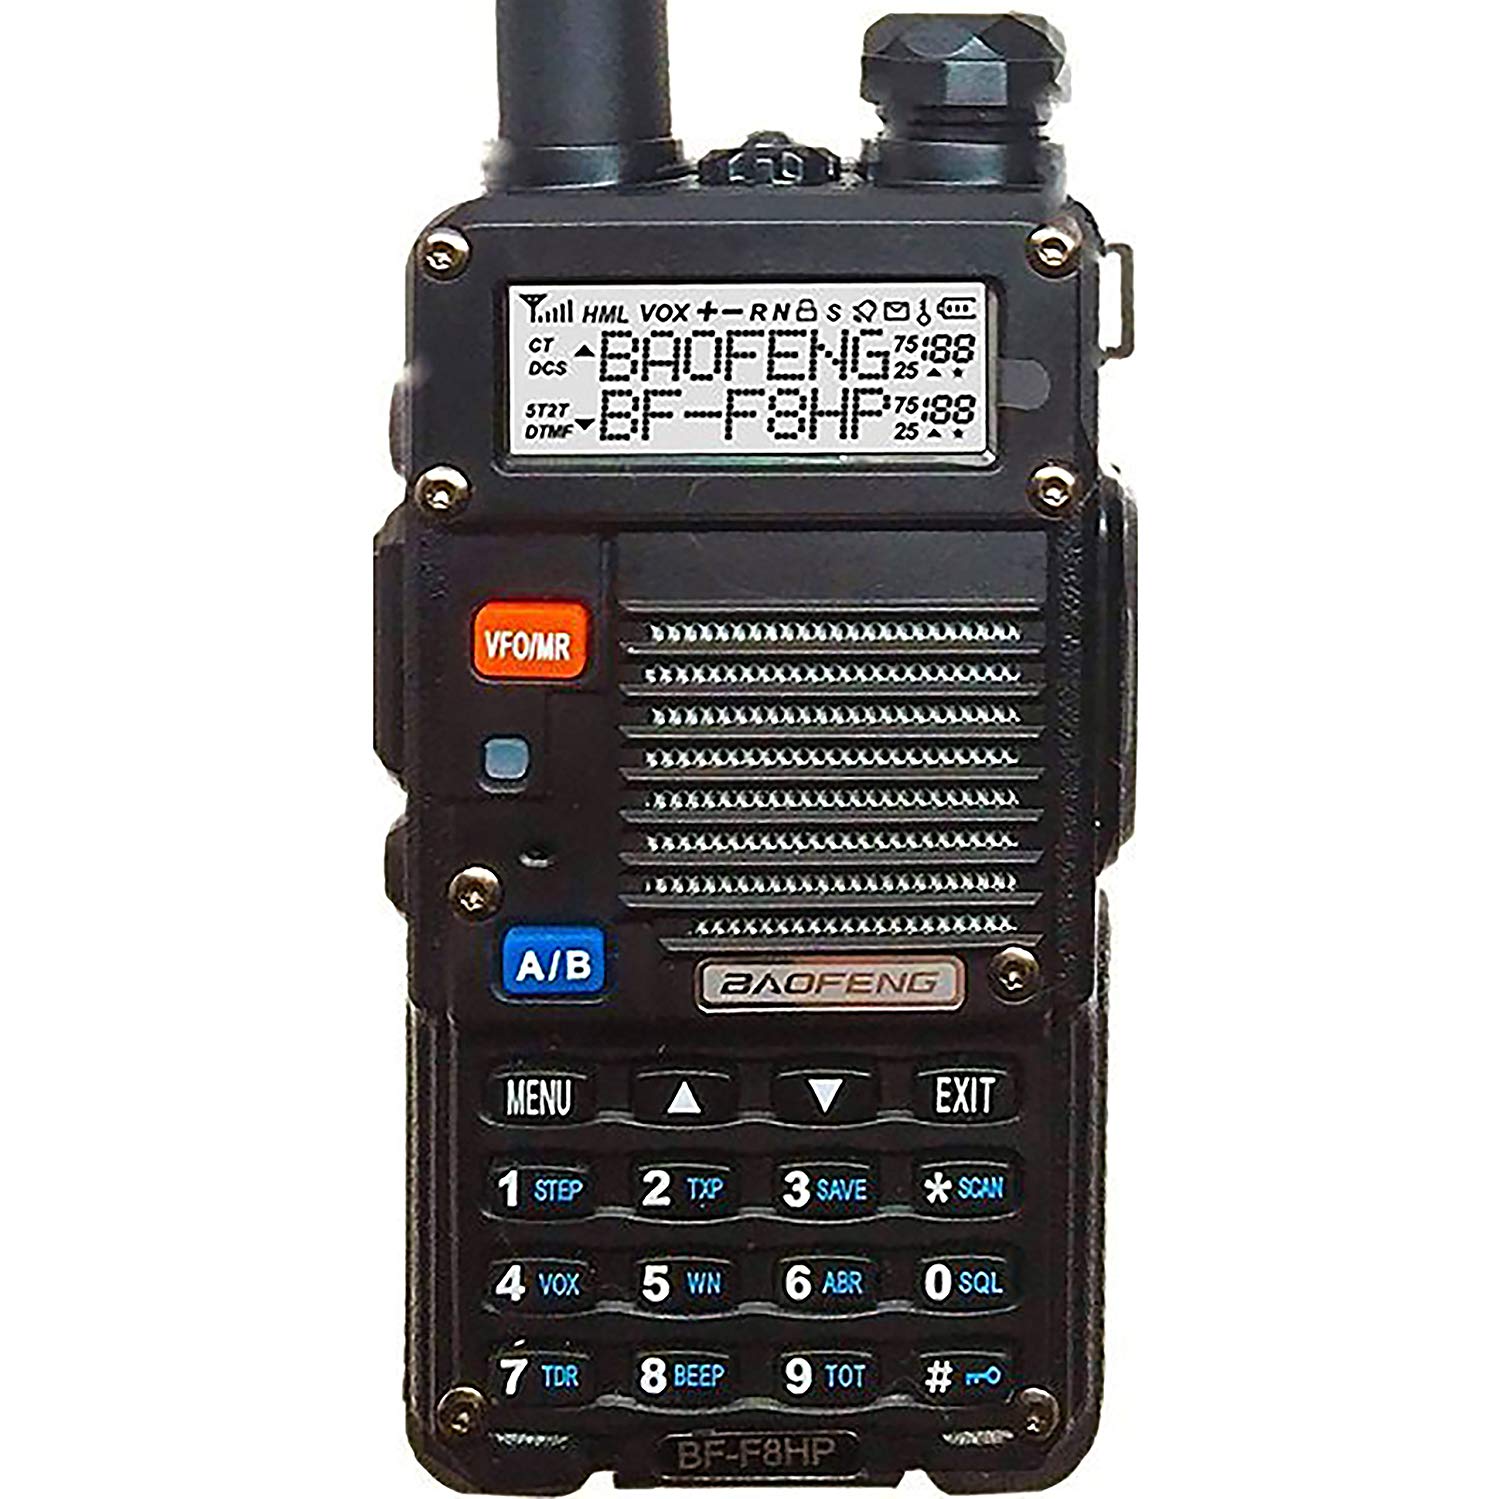
The BaoFeng radio is one of the cheapest two-way radios you can get around you. It is a dual band handheld radio but that’s not all there is to this radio, BaoFeng is a small sized radio, can cover many frequencies with many other great features you may not find on other radios, this has made it really popular among other walkie-talkies.
Most BaoFeng radios support both the UHF and VHF frequencies and can work in 12.5 KHz (narrowband) or 25 KHz (wideband). BaoFeng radios can give a power output of up to 8 watts as well as channel steps for as low as 2.5 KHz.
But as popular as it is, the BaoFeng radio is quite difficult to program. This is a shortcoming from the manufacturer, but many experts have found a solution to this fault, thus making it easier for BaoFeng lovers to use the device. Now, this is what I hope to share with you in this article. I have compiled from different researches a list of DIY steps that will help you program your device to work correctly.
BaoFeng radios can either be manually programmed, or computer programmed, both of which I’d discuss in this article. Most BaoFeng users prefer to program their radio manually from the radio, so here’s the step- by- step programming instruction.
How to program the BaoFeng radio (Simplex)
Step 1:
Press the VFO/MR mode on. {VFO = variable Frequency operation mode, MR= Memory (channel) mode} and select the frequency mode.
P.S: the VFO/MR button is at the front by the top right in most cases.
Step 2:
Press the A/B frequency button and chose the A side (upper display). Ensure that that the A side is used to program channels into the radio; otherwise, your data will not be saved.
Step 3:
Select Band to choose either 470MHz (UHF) or 136 MHz (VHF). The operation will be canceled if an incorrect frequency band is chosen.
Step 4:
Deactivate TDR (dual standby). To deactivate, press the menu button, key 7, and the menu button again.
Press the down arrow key, select OFF, menu, and then exit. It is essential to turn off the TDR if programming from the radio.
Step 5:
Enter frequency into the radio.
(You may skip step 6 if you choose.)
Step 6:
Enter the transmit CTCSS/DCS code
To enter the CTCSS code, press menu > 13 > enter code XXXX > menu > Exit
To enter the DCS code: Press MENU > 12 > menu > choose code XXXX > Menu > Exit
Step 7:
Assign frequency to a channel.
To do this; press MENU > 27 (Memory channel) > MENU > enter channel number XXXX > Menu > Exit
How To Program BaoFeng Radio (Duplex)
Step 1: Press VFO/MR to enter the frequency mode
Step 2: Press A/B or Axit/B and choose the A display
Step 3: Press BAND for the frequency band and select 136MHz (VHF) or 470 MHz (UHF)
Step 4: Deactivate TDR. Press Menu > 7 > Menu Type -0- MENU > Exit.
Step 5: (important tip) Delete the channel to be added. (not necessary for first time channel setup.)
MENU > 28 > MENU > Channel number > MENU > Exit.
Step 6: enter the repeaters output frequency. Use your keypad to enter the frequency
Step 7: delete the CTCSS/DCS codes entered previously or if programming for the first time, put off the CTCS codes
- RX DCS – MENU > 10 MENU > enter 0 (OFF) > MENU > EXIT
- RX CTCSS – MENU >11 > MENU > enter 0 (OFF) MENU > EXIT
- TX DCS – MENU > 12 > MENU > enter 0 (OFF) > MENU > EXIT
- TX CTCSS – MENU > 13 > MENU > enter 0 (OFF) > MENU > EXIT
Step 8: type in the repeater frequency offset by pressing
MENU > 26 > MENU > enter the offset for 2 meter or 70 cm repeater > MENU > EXIT
Step 9: Enter the transmit frequency shift.
MENU > 25 > MENU >enter 1 for positive shift or 2 for negative shift > MENU > EXIT
Step 10: Enter the transmit CTCSS/DCS code.
CTCSS – MENU >13 > MENU > enter/choose code XXXX > MENU > EXIT
DCS – MENU >12 > MENU > choose code XXXXX > MENU > EXIT
Step 11: Enter the repeater output frequency.
Use the keypad to enter the frequency into the radio.
Step 12: select the receive frequency to the same channel.
MENU > 27 > MENU > enter channel number XXX > MENU > EXIT
Step 13: Press the Scan button to activate Reverse Mode and display the transmit frequency.
Step 14: Assign the transmit frequency to the channel.
Press MENU > 27 > MENU > enter the same memory channel in step 27 > MENU >EXIT
Step 15: Press the Scan button to exit.
How To Program Baofeng Radio Using CHIRP Software
Another way you can program your BaoFeng radio is by using the CHIRP software. This programming software is available for free online and requires
A computer, A BaoFeng USB programming cable and you will need to add up to 128 channels on your radio.
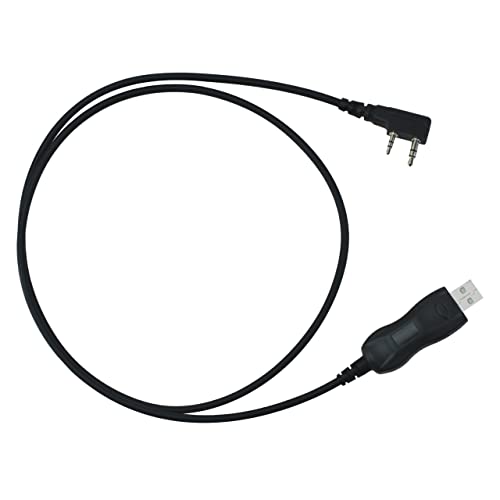
- The PC03 is the recommended hassle free radio programming cable designed for use on the Kenwood K1 Jack standard commonly used on many two way radios including: Baofeng, BTECH, Kenwood, Retevis, TYT, pxton, Tidradio, Kenwood, Wouxun, Radioddity, along with several more brands.
- The PC03 is the genuine USB programming cable you want for easily connecting your radio to your computer. No Driver Issues - No old drivers needed - Plug and Play
- Unlike the common "clone" USB programming Cables available Amazon - These cables just work! You will still need need to download the programming software needed for your radio.
So let’s get started with the steps.
Step 1.
Open the CHIRP software on your computer, then plug your BaoFeng with the USB cable and connect the cable to the computer USB port.
Get a copy of the existing configuration from your radio.
On the CHIRP software, select RADIO > Download from the radio. (CHIRP will require some information about your radio and the computer port it is connected to after which the already programmed channels on your radio will be listed out
Step2:
In CHIRP, go to FILE > Open stock configuration > select the channel groups you’d love to add to your BaoFeng
Step 3
Go back to the BaoFeng tab and click on the first empty channel. The click
EDIT > PASTE into your radio’s configuration.
BaoFeng allows up to 128 channels in its memory, so if you are out of channel slots, you can add more. To do this, you change the default slot number from 25 to whatever number of channels you intend to add. Maximum is 127.
Step 4
Upload the new configuration to your radio. Select RADIO > Upload to RadioCHIRP will copy this to your BaoFeng’s memory.
Once you are done, your BaoFeng radio will be programmed with the GMRS, FRS, MURS and NOAA weather channels with enough space left for additional channels of your choice.
How To Unlock BaoFeng Radio
Sometimes, it is possible that you are locked out of your device. This is to say that the device may no longer be able to transmit. MENU 40 is first recommended step to take, that is to reset to factory setting. It may require you to reload the device’s original software which can be accomplished by using CHIRP.
So, whenever you observe any of this erratic behavior on your BaoFeng radio,
Transmitter/receiver lockout
Irregular channel changes
Channel 0 changes to default and others, what is required is a software restore.
To restore the radio to its original software, you can use any of these two.
1. Recovery with CHIRP software
Open the latest CHIRP software and from the toolbar, select radio download to create a current image. Then save the image file.
On the CHIRP left side toolbar, select settings. The areas labeled Firmware message will show the firmware version of the radio. That is:
If FW Message 1 contains “VER,” the message two will include the firmware version.
If FW message one does not contain “VER,” then the firmware version is in the message.
Once you find the firmware version, you then go to the CHIRP recovery site and download the fresh recovery image that matches your radio’s firmware version and save afterward. It is important to note that the version of the recovery image must match the firmware version of the radio being recovered.
That is firmware message 1 and firmware message 2.
Then select Radio/upload radio from the top toolbar of your CHIRP software to upload the new recovery image to your radio.
Your radio is now set to its original settings.
After these steps, copy and paste the channel information from the old image file to the new recovery image template and upload the new template to your radio.
2. Recovery with Factory software
This is needed to load factory software to a VHF/UHF radio. To do this:
Open the factory software
Open the “other” tab at the top of the page
From the screen, choose read
Select “more than 480MHz to allow transmit.”
Frequency band should be 136-174 MHz (VHF)/ 400-520 MHz (UHF).
Select WRITE
*the TX function will be restored
*Frequency data will not be changed
All things being equal, all menu items should restore to factory settings
The menu functions will reset if you restore from a good CHIRP backup.